

Dielines in Packaging Design: How to Read the Cutting Forme
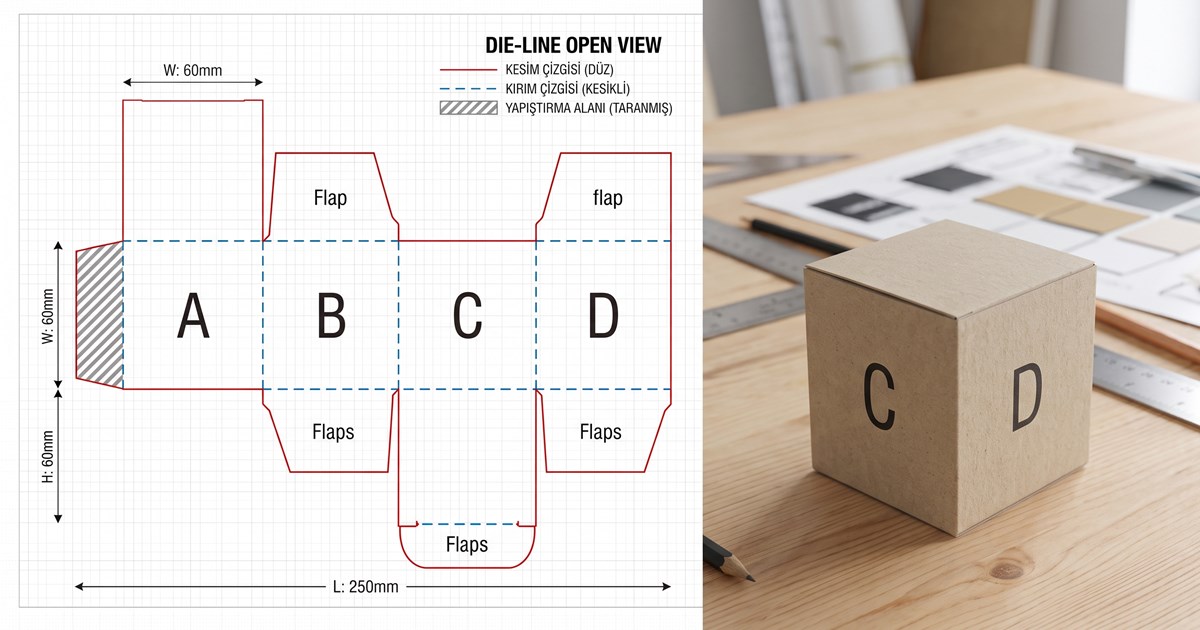
A brochure file answers one question: what gets printed. A packaging file has to answer four at once — what gets printed, where it gets cut, where it gets folded and where the glue goes. The carrier of all four is the dieline, also called the cutting forme. Not being able to read a dieline is the source of most mistakes in packaging design, because artwork that looks flawless on screen can end up upside down once folded, put its barcode across a crease, or produce a carton that never sticks together.
What a Dieline Is and What It Says
A dieline is the vector drawing of the carton in its flat, unfolded state. It marks what will be cut, what will be folded and what will be glued, each with a different kind of stroke. The workshop that builds the cutting forme reads that drawing; the designer places the artwork onto the same drawing. The dieline is therefore a shared language between two different trades, which is exactly why it is never altered: its dimensions are not changed, its strokes are not deleted, and it is not moved off its own layer.
The design is always built on the flat state, but the decisions are taken by looking at the folded one. Two panels sitting side by side in the flat drawing end up behind one another once the carton closes; a bottom flap that appears at the very bottom of the flat file can sit on top of the closed box. On any serious packaging job, therefore, the artwork is checked against a folded mock-up as well as the flat file.
| Stroke | Usually drawn as | What it means | Design rule |
|---|---|---|---|
| Cut | Solid line | Where the blade cuts through the board | The finished outline; the background must extend past it |
| Crease | Dashed line | Where the board is pressed and folded | No text, barcode or fine rule on it |
| Perforation | Dotted line | A partial cut, meant to be torn by hand | The direction of the opening tab belongs in the design |
| Glue area | Hatched or coloured area | The surface the adhesive touches | Must be free of ink, varnish and lamination |
| Fold direction | Arrow or an in/out label | Which way the crease folds | Determines which face ends up outside, and so the artwork orientation |
A dieline is not printed
These strokes are a production instruction, not part of the artwork. They belong on their own layer and must stay out of the print; the usual method is to define the dieline as a separate spot colour and exclude that colour from output. Drawn as ordinary lines inside the design, they really will print and appear as thin coloured hairlines all over the carton.
Board Thickness Changes the Size of the Box
In flat printing the thickness of the paper has no effect on the size; in packaging it determines it. The product that has to fit inside is measured against the internal dimension, but the cutting forme works on flat board. As the board folds, every wall intrudes by its own thickness. On the simplest carton this means the external dimension is two board thicknesses larger than the internal one, and wherever a flap tucks inside another wall the allowance grows further.
The real trap here is assuming that the weight determines the thickness. It does not. The actual values in our packaging calculator make the point: at the same 350 gsm, gloss coated board measures 0.285 mm while bristol measures 0.490 mm. That is a 72% difference and it goes straight into the size of the box. Holding the weight constant and changing the type of board changes the dimensions of the carton.
| Board | Thickness | Allowance from two opposing walls | Bulk |
|---|---|---|---|
| Gloss coated | 0.285 mm | 0.57 mm | 0.81 cm³/g |
| Kraft | 0.350 mm | 0.70 mm | 1.00 cm³/g |
| Matt coated | 0.358 mm | 0.72 mm | 1.02 cm³/g |
| Luxtriplex | 0.455 mm | 0.91 mm | 1.30 cm³/g |
| Bristol | 0.490 mm | 0.98 mm | 1.40 cm³/g |
The Glue Area Must Stay Unprinted
What holds a carton together is the adhesive gripping the board — and it grips board, not ink and not a film of varnish. A background printed over the glue flap, a varnish drawn across it or a lamination covering it all place a foreign layer between the adhesive and the board and weaken the bond. The result usually shows up not immediately but after despatch: cartons open on the shelf or in transit.
- The area is left entirely unprinted; not even the background colour is extended into it.
- On laminated work the area is excluded from the lamination, and the printer must be told so explicitly.
- Where varnish is applied, the varnish mask is prepared so that it leaves the glue area out.
- Foiling, embossing and any other surface treatment must not spill into it either.
- Its width depends on the size of the carton and the adhesive; the width marked on the dieline is not to be narrowed.
Discuss this up front on a laminated carton
Lamination is a film applied to the whole surface, so it covers the glue area too. Printers solve this either by masking the area or by using an adhesive that bonds onto the film. Both solutions exist in the production flow, but they have to be known when the order is placed — once it is noticed after printing there is no way back.
Cutting Tolerance Is Wider Than in Flat Printing
A guillotine cuts along a straight line and its only variable is the stack shifting, whereas a cutting forme cuts a closed and complicated outline all at once. The blades in the forme wear down over time, board changes size slightly with humidity, and the alignment between forme and sheet adds its own share. With those three stacked on top of one another, the tolerance accepted in packaging is wider than in flat printing. The practical consequence: a safe margin that suffices on a brochure does not suffice on a carton, and critical elements must be kept further from the cut.
| Criterion | Flat printing | Packaging |
|---|---|---|
| Cutting method | Guillotine, a single straight line | Cutting forme, a closed and complex outline |
| What the file carries | Only what gets printed | What gets printed, cut, folded and glued |
| Bleed | Equal on every edge | Greater on tuck flaps and the glue area |
| Safe area | Inside the trim | Away from both the cut and the crease lines |
| Cutting tolerance | Narrow | Wider; forme wear and board movement are added |
Grain Direction and Cracked Creases
The fibres in board line up in one direction during manufacture, and that direction governs how it folds. A crease made parallel to the grain folds cleanly; a crease made across it is far more prone to cracking on the surface, and the crack shows as a white line, especially on dark backgrounds. A carton has creases running both ways, so both cannot be satisfied at once; the choice is made for the crease that is most stressed or most visible. Because the risk grows with heavier board, asking the printer about grain direction should be a standard step on anything above 300 gsm.
The Layout Mistakes Made Most Often
Barcode across a crease
On a folded surface the barcode bends and the scanner cannot separate the bars. Put it on a face that stays flat, well away from any crease.
Reverse panel upside down
A panel that looks right in the flat drawing can end up inverted once the carton closes. The check belongs on the folded mock-up, not the flat file.
Background over the glue flap
The surface the adhesive needs is covered in ink and the carton opens over time. Stop the background at the edge of the glue area.
Text too close to the cut
Tolerance is wider in packaging; a margin that causes no trouble on a brochure gets the text shaved off here.
How to Deliver the File
A packaging file carries every rule that applies to a flat print file — bleed, resolution, CMYK, embedded fonts — and adds its own on top. Our print-ready file checklist covers the first group; the list below covers the second.
- Is the dieline on its own layer and defined so that it will not print?
- Have the dieline's size and position been left untouched, with the artwork aligned onto it?
- Are the background and images extended past the cut by the bleed given on the dieline?
- Is the glue area completely free of ink, varnish and lamination?
- Are barcode, text and logo far enough from both the creases and the cut?
- Has the folded state been checked and the orientation and order of the panels confirmed?
Starting from a template closes most of this list
A dieline template prepared for the product supplies the cut, crease and glue areas on the right layers, at the right size and with the right bleeds already set. Placing the artwork onto that template instead of building a document from scratch resolves four of the six points above at the first step.
Conclusion
Reading a dieline looks like a technical skill but is really a change of viewpoint: thinking of the artwork not as a flat surface but as an object that will be folded and has to stand up. Once that view is acquired, the rest comes down to a few rules — do not touch the strokes, leave the glue area bare, account for the thickness, check it folded. The cost of an error is higher in packaging than in flat printing, because the problem usually appears not on press but when the carton is folded.
